Few things are as frustrating as flicking a light switch and having the light not turn on. If you’ve ruled out a burnt-out bulb, the switch itself may be faulty.
Replacing a single-pole light switch is a straightforward DIY project that takes only a few tools and a little know-how. If you have experience with electrical work, you may be able to do the job in just 10 to 15 minutes, but you need to follow some safety precautions.
If you’re uncomfortable working with electricity, contact a licensed electrician to do the job.
How Do Light Switches Work?
Switches work by controlling the flow of electrical current in the hot wire. Power comes in through the wire attached to the bottom of the switch, then goes out to a light or device through the wire attached to the top.
Hot wires are usually color-coded black or red, with neutral ones white and ground ones green, but the switch’s hot wire may also be white in certain cases. If the hot wire is white, wrap it with black electrical tape to show that it functions as a hot wire.
When you flip the switch, power flows through the switch and hot wire to the light fixture. The neutral wire returns the electricity to the panel, and the ground wire provides a safe path for excess electrical current. Always be sure to connect the ground wire properly for safety.
What Tools and Supplies Will You Need?
Make sure you have the proper tools for the job before you start. Here are the basic tools and materials you’ll need to replace a light switch successfully:
- Screwdrivers: You’ll need both flat and Phillips head screwdrivers to remove the switch plate cover and disconnect the wires. Make sure the screwdrivers are insulated to avoid shocks.
- Non-contact voltage tester: A tester allows you to safely detect live wires even when the power is off at the breaker panel. Always double-check for power before working.
- Wire strippers: Use wire strippers with notches for different gauge wires to strip wire insulation.
- Electrical tape: Standard black electrical tape is for rewrapping wires and reinsulating any exposed wires.
- Light switch: Buy a standard single-pole, single-throw replacement wall switch. You’ll find different styles, but the key differences are quality and weather resistance. Dimmer switches are popular for dining rooms and bedrooms. If you need help determining which replacement switch you need, take the old one to the store for an identical match.
Have safety equipment ready, including a flashlight, gloves, and safety glasses, to protect yourself while you’re working in the electrical box.
Step 1: Turn Off the Power at the Circuit Breaker
Before you work on the switch, make sure that the light is off at the switch and at the breaker.
Start by opening the circuit breaker panel, typically located in your garage or basement, and turning off the breaker that powers the switch. If the breakers aren’t labeled, turn on the light and try each breaker until the light goes off. If you’re unsure or the switch wasn’t working, turn off the main house breaker to shut down the entire panel. Flip the switch a few times to make sure the power is off.

Step 2: Remove the Switch Cover Plate
Taking off the cover plate will let you access the switch-mounting screws and wires. Once you’ve confirmed the power is off, use a screwdriver to remove the screws holding the cover plate in place. If the plate is stuck to the wall with paint, run a utility knife between the cover plate and the wall to cut through the seal. Store the screws and plate for use later.

Wear gloves when you use the utility knife, and be careful to only apply enough pressure to cut through the paint.
Step 3: Unscrew the Existing Switch
Once the cover plate is off, you’ll be able to see the switch mounting screws. Remove these screws, then gently pull the switch out from the electrical box to access the wires behind it.
During this step, move slowly and carefully so you don’t damage the wires. The switch will still be connected, so you’ll need to wiggle it to detach it. Don’t let wires drop back into the electrical box, as this can make reconnection more difficult.

Step 4: Disconnect and Label the Wires
To make sure the new switch is wired correctly, label each wire with its function. You don’t want to be confused later on.
Carefully disconnect each wire one at a time, and use tape to label them according to their location on the old switch. Take note of the position of each screw terminal as you go.

A few common labels include the following:
- LINE (incoming hot wire)
- LOAD (wire to light)
- NEUTRAL
- GROUND
Note that the incoming hot wire may still be attached to the darker copper screw on some older switches.
Step 5: Connect the Wires to the New Switch
Refer to your wire labels to connect each wire to the matching terminal on the new switch. Line up the colors exactly: black to black, white to white, and so on.
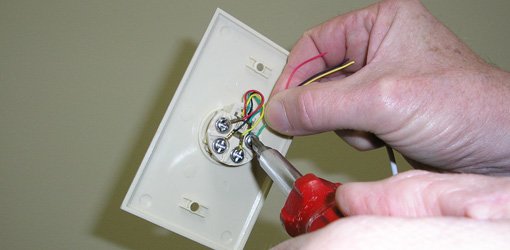
Strip about ½ inch of insulation from the end of each wire, and form a hook in the bare wire with needle-nose pliers. Place the hook around the appropriate screw terminal, and tighten firmly to secure the connection.

Ensure bare ground wires are formed into a circle and connected to the green grounding screw. The ground wire is an important safety component. After connecting the wires, gently tuck them into the electrical box, leaving room for the switch.
Step 6: Mount and Test the New Switch
With all wires securely connected, it’s time to mount the new switch and test it. Carefully tuck the wires into the electrical box, leaving enough room for the switch to fit snugly. Position the switch and secure it with the mounting screws.
Before you flip the breaker back on, carefully review your work and double-check all connections. If everything is correct, replace the cover plate and turn the power back on. Test the switch by flipping it on and off several times.
If the light doesn’t turn on correctly, turn the power back off and recheck the connections.
Common Mistakes and How To Avoid Them
DIYers can make a few basic mistakes when they replace a light switch:
- Misidentifying wires: A misidentified wire can lead to an improper connection, which can be dangerous. Always label the wires when you disconnect them from the old switch, and double-check the labels before you hook wiring up to the new switch.
- Choosing the wrong type of switch: Three- and four-way switches allow you to control a single light from multiple locations. While they look the same, they have different wiring requirements than the single-pole switches we address in this guide. Carefully examine the wiring diagram included with the switch and ask an electrician if you need help knowing which switch to buy.
- Forgetting to check for a ground connection: Omitting a ground connection is a potentially serious safety hazard. Even if the switch works without it, be sure to attach the ground wire securely to the green terminal on the switch.
- Failing to connect the wires securely: Loose wire connections can lead to a malfunctioning switch in the best case and an electrical fire in the worst case. Tightly connect all wires around their respective terminals, and consider using wire nuts for added security.
This site receives compensation from the companies featured in this listing, which may impact where and how products appear. This listing doesn’t feature all companies, products, or offers that may be available.
FAQs About Replacing a Light Switch
Aside from the new replacement switch, you’ll need screwdrivers, wire strippers, a voltage tester, electrical tape, and safety gear like gloves.
Turn off the power at the breaker box before removing the cover plate screws. Unscrew and detach the switch from the electrical box. Carefully disconnect the wires while labeling each one.
There may be a hot line, load, neutral, and ground wire. The line brings power into the switch, and the load goes to the light fixture. Neutral wires allow current to go back to the panel, and ground wires let excess current discharge for safety.
You should never, under any circumstances, leave the power on to replace a switch. To avoid the risk of shock, injury, damage, or electrical fires, always turn off the power at the breaker before you begin work.
First, double-check that all connections are tight and correct, and that the wires have been stripped properly. If the switch doesn’t work after that, the issue could be with the light fixture itself.
Replacing a standard single-pole switch is relatively easy and takes about 15 minutes. The most important things for a successful project are flipping off the breaker, labeling wires, and making tight connections in the right places.


